Monday, 2 June 2014

Annie's Mixed Media Board (Vintage Shabby Chic)

 
Annies Mixed Media Board
 
I am pleased to share at last Annie's Mixed Media board
or as Annie herself describes it "Vintage Shabby Chic"
What a transformation as you will see from the following photographs. 
 It is fabulous Annie and a really lovely way to remember your Mum and Dad.
 
Embossing Paste background
 
Lots of work to place the items
 
Here is a close up of a section of the board, really lovely colours used.
 
Closeup of top corner.

 
Hope to have more boards soon, but as our craft day is on Wednesday,
the next post will be about our pennant swaps.


Monday, 19 May 2014

May Pennant Swaps

Close up of my pennant


What a busy May workshop and rather occupied with our boards, we eventually found time to sort out our pennant swap and what a treat they all were, though I photographed them I somehow have not managed to take one of Linda's, perhaps I can add it later.

Here are two fabulous pennants by Liz and Annie
Liz and Annie
These lush pennants are by Pamela and Tanya
Pamela and Tanya
  
Lastly my pennant, using one of my new water droplets stamps by Ryn
you can see more artwork and designs at  Designs by Ryn
My pennant
Back with more boards later!

Sunday, 18 May 2014

Linda's Mixed Media Board

Here are the various stages of Linda's lovely board which is
vintage in flavour and so very Linda.


Linda covered her board with torn vintage printed papers, a doily.
Using stencils and embossing paste in random areas and a light touch of gesso.
Lace and muslin have been attached and several
die cuts along with flowers and charms.
Lastly here is the finished board which is I think fabulous, I love the
gathered lace under the central tags and the colours used for the die cuts. Very Parisian!
Linda's finished board.


Back tomorrow with our May Pennant swaps.


Friday, 16 May 2014

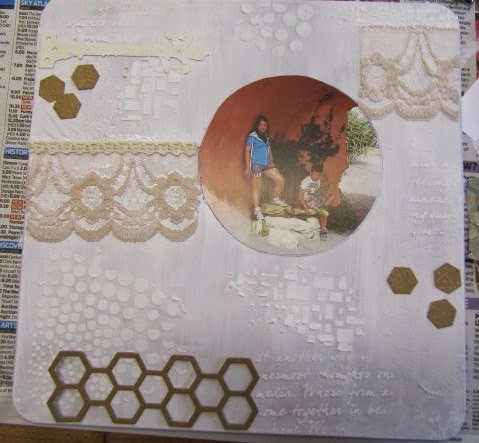
My Mixed Media Board

Here we go with my board, though I did not have enough boards for everyone,
so I salvaged an old chess board that a friend gave to me, I used the back of it.


I glued the photograph onto the board after covering two layers of gesso,
then brushing over the photo with more glue (I used matt Mod Podge) to protect it. 
 I then used a few stencils and embossing paste (homemade).  Glued down the lace
and started to add the various treasures/junk that I had ready to fill it with. 
 
The photo is of my two wonderful grandchildren and was taken last year when
we visited Butterfly World in St. Albans. 
They have enormous terra cotta pots everywhere and this photograph was inside a broken pot.
 
The frame surround on the photo is from an old clock I took to pieces. As you can see there are numerous items here unrelated.  My intended theme was to be "Time Flies" hence the clock and watch face relating to our grandchildren that grow so quickly. 
 I could still add these words somewhere later.


I used acrylic ink sprays to build up the layers of colour,
 taking care to dry between each colour.  Finishing with a shimmer spray
 (distress inks mixed with Perfect Pearls and water in a mister).
 I also added tiny accent beads before spraying.  Leaving the centre a lighter
colour to lead the eye to the photograph. 
The actual board is lighter than it appears above.
 
The following a few closer shots.  Since taking these photographs
I have highlighted some areas with white gesso.


I really enjoyed working on a larger area and will definitely make another when
I find the time.
 
More tomorrow.


Thursday, 15 May 2014

Jane's Mixed Media Board

The following photos show the various stages of decorating this wonderful quirky
board by Jane, this is very different and filled
from boxes brought along of all manner of components,
 transistors, capacitors, nuts, bolts, watch parts, circuit boards, fuses,
coiled wire and much more as you can see.


Jane started by adding a design with embossing paste (diy paste)
which you can hardly see in the background but it is there!
 
Lots of hot gluing for these heavy
components, we nearly ran out of spare sticks!
 
 
A few more elements have now been added, but far from finished.
 
 
Close up to show the height of components


 Jane chose the photo of her son (who is an Engineer) was of his PhD ceremony,
then used the items as her theme around
the board which I think looks really impressive.
 
Jayne's Finished Mixed Media Board
 
Finally Jane sent me this photo of the fantastic finished board,
where some of the components have not been painted over.
 
 It is fabulous and I love the embossed background design.
 I am sure her son will love it.
 
A closeup of the embossed background.


More tomorrow!


Wednesday, 14 May 2014

Mixed Media Boards


Over the next few posts I shall be sharing the wonderful finished boards
that the members of our Craft Club had great fun with.

Everyone started with a 12" square mdf board, I had sealed one side
 ready for everyone to decide on how they would decorate them,
several ideas were given beforehand including a fabulous
inspirational video by Einett Kessler, which you can find here 
 
Some of us concentrating!
 
 
We all brought along our boxes of treasures to glue to the board, (well some people would
call it junk)  most of us worked completely out of our comfort zone,
but we threw ourselves into it and couldn't wait to see how
they would all take shape. 
Paint, gesso, stencils, inks and extra embellishments were also available.
 
Here we will start with Tanya's masterpiece,
an absolutely awesome Mixed Media art piece.
.
 
Placing of pieces on the board
 
 
Using photographs printed onto canvas of her son Theo, she surrounded
these with personal items relating to Theo. 
 
Part finished
 
 
Tanya was the only one of us who decided to use black gesso which has been 
used to great effect, finishing with shimmering ink sprays and alcohol inks. 
 
Tanya's Mixed Media Board


More next time!


Thursday, 24 April 2014

Medal Board

Not my usual crafty share but something I worked on recently for my
son Robert's birthday.  Three days spent in the shed with painting
and drilling, but worth it when I gave it to him and saw his look of surprise. 
 So here it is, a board to hold his medals and on the left, hooks and
bulldog clips to hold his running bibs. 
 
After I had finished painting (3 coats of paint) I didn't like the patchy finish,
 so I gave it a good sanding and it ended up with a sort of denim finish
which I preferred.  I stamped the verse on the left with Archival Ink,
 for "Celebrate Every Mile" letters were from my hoarding pile of Grunge board die cuts
painted with silver Distress Paint.
 
 
Medal Board


The verse below seemed appropriate as he is a huge film fan.
 
 
Running verse


He runs regularly and has completed quite a few half marathons both here, Paris and Helsinki..
However I may have overdone it with the hooks, but he has plenty of time to fill them up!
 
Medal board


I purchased a large sheet of mdf  and after cutting the above board
I asked the diy shop to cut the remainder of the sheet into 12" square panels,
ready to use at one of our craft group meetings.  
 A mixed media board is on the cards, just got to organise it now.
 .