 |
| metal tape before ink |
In July we used it to cover a frame. First applying die cuts and punched images to the frame, covering with the tape (first using a template to cut the tape as the frame is oblong and this made it easier to apply). Defined with a paper stump, a stylus also used to add more detail.
 |
| After inking |
Alcohol inks then used to colour the metal. Lastly raised areas sanded to reveal the metal. As well as die cuts, several small additions of mesh added underneath. Additional squares added to make corner features. Metal wheel tools added even more of a design. Stickles added on random areas.
 |
| Using embossed metal tape and inks |
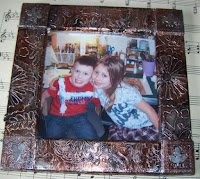
Below is a frame where the metal tape (before removing the backing) had been embossed using an embossing folder. When applied to the frame, it still holds a lot of the definition. The photo is of my lovely grandchildren helping me in my craft room.
We finished with a card, where we used a punched butterfly shape under the metal tape onto cardstock, cut with a scallop punch. Squiggles added around the die cut to give more detail. Alcohol inked and lightly sanded.
Until next time...

I'd forgotten about this technique, Sheel. Msut have a go now I have more dies. These examples are wonderful and a great photo with Sir Tim!
ReplyDelete